Heaven on Earth

Heaven on Earth
Showing posts with label Sauces. Show all posts

Thursday, February 27, 2014

Lemon Meringue Pavlovas

Remember that Lemon Curd?  It's the filling in this dessert.

Have you ever eaten a Pavlova?  It's generally accepted that this dessert was invented when a famous Russian ballerina named Anna Pavlova visited New Zealand on a worldwide tour in the late 1920's, (although Australia claims it was invented in their country). It's basically a meringue base with whipped cream and fresh fruit on top.  The filling is put in a day or so early to give it time to soak into the meringue.  The Pavlova is soft and "pillow-y" when served instead of crunchy.  It's a little piece of heaven in my book.

Quite a few years ago, I had to serve luncheon to a very  large group of church women and I was given a tight budge to work with. What dessert do you serve to 90 women when you're on a budget?
It was Easter and eggs were on sale in all of the markets so I decided to make Pavlova.  But Pavlova only uses egg whites and you have egg yolks left over.  With 90 servings, I had A LOT of yolks left over, and what would I do with that many yolks?  So I made lemon curd and made it into a mousse with a smaller amount of whipping cream folded into the curd.

 I stretched that budget quite a bit farther because I needed less whipped cream to fill the meringues.  They turned out delicious!  I served them with a berry sauce made with frozen berries because fresh fruit wasn't in my budget.  I had many, many requests for the recipe.

I made these for a dinner party last week and topped them with fresh berries.  I layered the cream and curd rather than folding it together.  Either technique works and both the sauce or the fresh fruit are equally delicious.
You can also pipe the meringue into one big circle and cut individual wedges but I like to make personal meringues.  The components can be done ahead of time too, which makes these perfect for a crowd.

I think Ms. Pavlova would approve.
  Pipe one circle like this...And then pipe one circle around the outside of this circle to make a cup.
 After baking.
 These meringues can be made ahead and stored in an airtight container at room temperature for 2 weeks.
Personal Lemon Meringue Pavlovas with Berry Sauce
                                                                  
                                                                             Bonnie Barker

Meringues:
6 egg whites
Pinch of cream of tartar
1 1/4 cups of white sugar

Preheat oven to 250° F.  
     Whip egg whites on high speed until foamy.  Add cream of tartar and mix well.  Add sugar, 1 Tab. at a time (if you add the sugar to quickly, the weight of it will deflate your meringue).  Once the sugar is incorporated, continue to whip until the egg whites are shiny and hold a very stiff peak.
     Place the meringue in a pastry bag and pipe eight 4 inch circles (I piped 3 1/4 inch).  I draw the circles upside down on parchment paper and then turn it over and pipe the meringues.  
     Bake for 1-2 hours until the meringues are dry and crunchy.  Turn the oven off and let them cool in the oven.
 
Makes 8 4-inch meringues

Lemon Curd:
2 cups sugar
12 eggs yolks
 1 cup lemon juice
 2 tablespoons lemon zest
½ cup(1 stick) butter, cut in pieces
½ tsp. pure vanilla extract

Wash and zest lemons.  Extract lemon juice.  In a heavy-bottomed, non aluminum pan, stir egg yolks with sugar. Whisk in lemon juice.  Cook on medium-low heat until mixture coats the back of a spoon.  Remove from heat and whisk in butter.  Strain through a chinois.  Add lemon zest. 
Cover surface with plastic wrap. 
Refrigerate for at least 4 hours. 
Can be kept in fridge up to 3 weeks. 

This curd is great to spoon over angel food cake, pound cake, or scones.  Experiment with combinations of fresh citrus juice for variety (do not use bottled lemon juice).  It will keep for up to a week in your refrigerator.

*To make this into the Mousse you will use for the desert you will need:
 1 c. heavy whipping cream

Whip the cream until it is very stiff.  Take about 1/3 cup of cream and carefully fold it into the curd.  Add this to the cream and fold in to lighten the mixture.  Now fold the rest of the cream into the lemon curd being careful not to stir and deflate the cream.

Mixed berry sauce:
1 Tab. butter
3 c. berries
1/2 C. sugar
1/4 cup fresh orange juice
1/2 tsp. ground cinnamon
1/4 tsp. ground nutmeg (I grate my own but powdered is fine)
1/4 tsp. ground ginger


     Heat the butter in a large pan until bubbling.  Add the berries and sauté" until they start to soften, 2 to 3 minutes.  Add sugar and juice and cook until sugar is dissolved, about 2 minutes.  Add spices and mix.  Remove from heat and allow to cool.  Refrigerate.

To assemble:

Place a small dab of curd on the bottom of the meringue to stick it to the bottom of the plate.  It will slide around the plate if you don't. 

Spoon lemon curd into the meringue and drizzle berry sauce over. 

You may want to spoon a small scoop of whipped cream on top and garnish the whole thing with some fresh berries.

You can also pipe one large circle of meringue and cut it into wedges to serve.


Friday, July 20, 2012

Herb Aioli


We love salmon at our house and we eat it every few weeks or so, especially in the summer because it's so easy to do on the outside grill and it is terrific cold..  B. is the grill master and I prepare the sides. Usually we eat it plain, sans tartar sauce with an extra squeeze of lemon because it's healthier. 

I purchased fresh salmon the other day.  Si posted this the same day, and I thought...aha!, I have ingredients to whip up my own version of her aioli.  It's not often I have sour cream in the refrigerator but I had some leftover from another recipe so I made up a very small batch of my herb aioli.
As you can see, the aioli came off the spoon quicker than I expected.  But B. didn't complain about the mishap and gladly ate it on the salmon that he cooked perfectly.

I grow many fresh herbs varieties.  Dill or chopped parsley would be wonderful here, and cilantro would be perfect for Latin food.  I love tarragon but be warned... a little goes a long way. It's a strong flavor, a bit licorice-like. And of course I had to add basil.  You could also use plain Greek yogurt for the sour cream (as Si did) and I love lemon so I used quite a bit of juice and zest in my aioli and I like to add a splash of vinegar as well.  Aioli is easy to change up.  Make your own using whatever herbs you like or have on hand. 

It's also great on sandwiches, on a veggie tray, and as a side to chicken.

Herb Aioli
½ cup of good quality Mayonnaise
¼ cup of sour cream
Zest of 1 lemon
½ lemon, juiced
1 clove of garlic, minced
½ teaspoon of white wine vinegar
5 basil leaves, chopped
½ teaspoon of chopped fresh tarragon
½ teaspoon of chopped fresh Italian parsley
Pinch of kosher salt, to taste
Fresh ground pepper to taste

Mix all ingredients well. Refrigerate mixture for at least one hour before serving.
Serve with fish, chicken, veggies, and use as a sandwich spread.

Makes 3/4 cup of sauce.

*Combine different quantities of fresh herbs to change up the flavors.
Cilantro, dill, Italian parsley, or any other fresh herb will work well. Add what your family likes.

Thursday, June 23, 2011

Shish Kebabs

When is the last time you thought about making?  I thought so. 
It's time to pull the skewers out of the cabinet and crank up the grill.  This was another pantry/fridge clean out.  I had some chicken and vegetables and wanted a change of pace.  They're fast-cooking, you probably have all of the ingredients in your pantry, and they're delicious.
If you use wooden skewers, soak them in water for a few hours before threading the food onto them so they don't burn .  And for some extra "fire insurance", place a piece of aluminum foil under the handles of the wooden skewers while grilling.

Teriyaki Marinade

¼ cup of honey
¼ cup soy sauce
½ cup of chicken stock or broth
2 tablespoons of ketchup
1 clove of garlic, minced
¼ teaspoon of ginger
freshly ground pepper
pinch of salt

Combine all of the ingredients until honey is dissolved.
Pour over meat or vegetable skewers and marinate for several hours or overnight.
Reserve some of the marinade to meat while cooking.

Discard the marinade after using over raw meat.

Linked to Fresh Food Friday and Friday Potluck

Tuesday, June 14, 2011

Compound Butter

It is finally grilling season here.  And to that end, Mr. CityHome got an early Father's Day gift.  We hosted a "little" shindig here last Saturday for 200 of our daughters closest friends.  Isn't Facebook Grand?  When they decided to throw a barbecue they had no idea so many would show up.  Good thing Dad broke out the new toy early.  The old Ducane and the new "Egg" were full for several hours.  We're looking forward to doing some smoking and grilling on this great piece of equipment.  We are both already in love with it after one night.


I rustled up some ingredients that I had laying around and made some compound butter to go with the whole salmon fillet we grilled tonight. 


Stuff a piece inside fish, chicken, or even a pork chop to add flavor and moisture.    Throw it over some grilled veggies.  It's fabulous on them too.  Suppose you have some leftover; seal it back up and toss it back in the freezer for next time.  It's also a great way to use up small bits of herbs you may have left from another recipe, or even your fresh garden herbs. Change up the variety of herbs, juices, and even fruits for different combinations of butters.

It makes a thoughtful hostess gift too.  Roll some parchment paper over the plastic wrapped butter, twist both ends opposite each other, and tie it up with some cute string.  It's a really good thing to have on hand. 
Compound Butter

4 Tablespoons of unsalted butter
2 teaspoons of lemon juice
½ teaspoon of grated lemon zest
2 Tablespoons of chopped flat leaf parsley
1 clove of garlic, minced
Salt and freshly ground pepper to taste

Bring butter to room temperature. Mix all ingredients into the butter until well incorporated.
Turn butter onto a piece of plastic wrap. Roll wrap around the butter and use it to form the mixture into a tight cylinder. Twist the ends of the plastic wrap in opposite directions and put into an airtight storage bag.
Store in the refrigerator for 2 hours or until firm. May be stored in the refrigerator for several weeks or the freezer for longer storage.  Cut into coins and place on top of warm meats or vegetables.
Serve on beef, chicken, fish, bread, vegetables, or even biscuits or muffins.

Tuesday, June 7, 2011

Chicken Tarragon Salad with Apples and Grapes

On the first Tuesday of June each year, the lovely Joan hosts the quilting group in her beautiful home and garden for brunch.  Her home looks like a feature in an upscale magazine.  I don't think I have ever seen more beautiful gardens.  So what is more fitting to bring to brunch in a lovely home/garden than this succulent, crunchy, fruity, herb-y, tangy, sweet, fresh, Chicken Tarragon Salad?  Absolutely nothing!!!!

Years ago I tasted a salad just like this in a local eatery and fell in love.  Lucky for me I soon purchased one of my all-time favorite cookbooks, Fosters Market, and found this recipe.  It was love at first bite and my family and friends have been loving it ever since. 

It might be just perfect for your July 4th celebration, or any other occasion or even no occasion at all.  It's perfect anytime, anywhere (in my humble opinion of course).  

Lemon Balm, Flat Leaf Italian Parsley, and Tarragon

Chicken Tarragon Salad with Apples and Grapes


6 cups of shredded chicken breasts
3 ribs of celery, sliced on the bias
1 cup of red seedless grapes, cut in half
1 tart apple of your choice, sliced thinly
1 ½ cups of Tarragon Mayonnaise
3 tablespoons of chopped fresh parsley
2 tablespoons of chopped fresh lemon balm (optional)
Salt and freshly ground black pepper to taste


Combine the chicken, celery, apple, grapes, mayonnaise, parsley, tarragon, and lemon balm in a blow and stir to mix. Season with salt and pepper.

Serve immediately or refrigerate until ready to serve.
This is better if made and allowed to marinate for at least 8 hours.


Tarragon Mayonnaise

1 cup of good quality mayonnaise
3 tablespoons of tarragon vinegar
Juice of 1 lemon
½ cup of the tarragon that comes packed in the vinegar (drained with stems removed or ¼ cup of dried tarragon soaked in the 3 tablespoons of vinegar listed above)
1 shallot minced or 2 tablespoons of minced red onion or scallion
Salt and freshly ground black pepper to taste


Place all of the ingredients except the shallots in a food processor and blend well. Add the shallots and pulse to blend.


Serve immediately or store for up to one week in an airtight container in the refrigerator.
Makes about 1 ¾ cups of mayonnaise.


*May also be used as a dip for vegetables, sliced tomatoes, or on a sandwich.


Cook’s notes:
I didn’t have a full lemon so I used the juice from ½ of a Clementine. To ramp up the lemon flavor I added about 1/3 cup of chopped, fresh lemon balm to the chicken salad. I did not like the taste or flavor of the vinegar soaked tarragon in the bottle of vinegar I had, so I omitted that and added 1 ½ cups of chopped fresh tarragon to the mayonnaise instead. The flavor was wonderful.


Wednesday, April 13, 2011

The Basil Mayonnaise That Stole the Show

I was in charge of a large party buffett for the woman in our church a few weeks ago.  We were having an activity that included a presentation by a professional organizer followed by a swap meet.  We probably should have listened to the organizer and then had the swap meet, but it turned out to be very successful anyway. 

The main dish on the buffet table was the turkey sandwiches on rolls. We also served seasonal fruits and vegetables, and cookies.  The food was presented in old canisters, toile trays, wicker picnic baskets, popover pans, and old canning jars; all old things you might find at a swap meet.  But the star of the buffet table was this basil mayonnaise.  I intended for it to be served with the sandwiches along with some cranberry mustard, but it also became the dip for the crudite instead of the ranch dip on the table.  I even saw some women sopping it up with their cookies...really.  Several woman thought that they had successfully snuck some home in water cups for later, but they were discovered.  It's apparantly quite hard to be discreet when hiding an open paper cup inside your purse.  One woman even told me it was good enough to drink.  I'll let you be the judge of that.

Basil/Herb Mayonnaise

This sauce is delicious as a sandwich spread, drizzled over sliced tomatoes, salad greens, steamed vegetables, or as a sauce for poached chicken, fish, or shellfish.

1 large egg or ¼ cup pasteurized egg or 2 cups Best Foods Mayonnaise
2 Tablespoons white wine vinegar
Juice of 1 lemon
Zest of 1 lemon (yellow layer only)
1 teaspoon of Dijon mustard
2 garlic cloves
2 cups canola or safflower oil (omit if using purchased Mayo.)
10 fresh basil leaves, cut into very thin strips (chiffonade)
2 tablespoons chopped fresh parsley
Salt and freshly ground pepper to taste

1. Place the egg or the mayonnaise, vinegar, and lemon juice (zest) in the bowl of a food processor fitted with the metal blade and pulse to blend. With the motor running, add the mustard and garlic through the feed tube.

2. Add the oil in a slow, steady stream down the feed tube, with the motor running, until the mixture becomes thick and is the consistency of mayonnaise. (Omit the oil if using mayonnaise and just blend together).

3. Add the basil and parsley and puree until well combined and the mixture is bright green. Season with salt and pepper and refrigerate in an airtight container until ready to use.

This can also be made in a blender with a feed tube in the lid. It keeps well for 5 days in the refrigerator, and is best made several hours before using to allow the flavors to blend. Leave out the basil, parsley, and garlic for plain mayonnaise, (but why would you want to?:)

I adapted this from the wonderful Foster's Market Cookbook.

Linked to Friday Potluck.

Thursday, September 30, 2010

Tasty Tomatillo Sauce

Every year I plant tomatillos.  Some years they are just OK, most years they are not OK at all.  I can nurse along just about anything in the garden.  Not tomatillos.  My friends and neighbors tell me theirs grow like weeds.  Not mine.
Until this year!
I fertilized, weeded, and fertilized some more.  I finally had success. 

My girls can make authentic Mexican food; our whole family loves Mexican food; the "real kind".  (The "kind" that we waited in line for, several hours before service, in front of Rick Bayless' Frontera Grill in Chicago hours before it opened so that we wouldn't have to wait in an even longer line with everyone else... twice on the same family vacation).  We got a really good table.  That's what being first in line does for you. 

We live in the southwestern area of the U.S. so we always have had great Mexican restaurants here.  And we love green tomatillo sauce.  I've tried several recipes (including Rick Bayless') but this is my original recipe; and it was my best one ever.  Really!!!  It must be those soft, sweet, ripe, garden tomatillos I used this time.  I usually buy them and I'm convinced that they pick them green like super market tomatoes (no flavor and rock hard).  Next spring, I will put more effort into my tomatillo plant, in fact I think I'll plant two!

This recipe is not exact.  I wish it could be but it depends on the flavor and sweetness of your fruit and the heat of your peppers.  Even the same chili variety can vary in "hotness", so be careful.  If you are sensitive to them, put some gloves or a plastic sandwich baggie over your hands as you handle them.  And whatever you do, don't rub your eyes after handling the peppers.
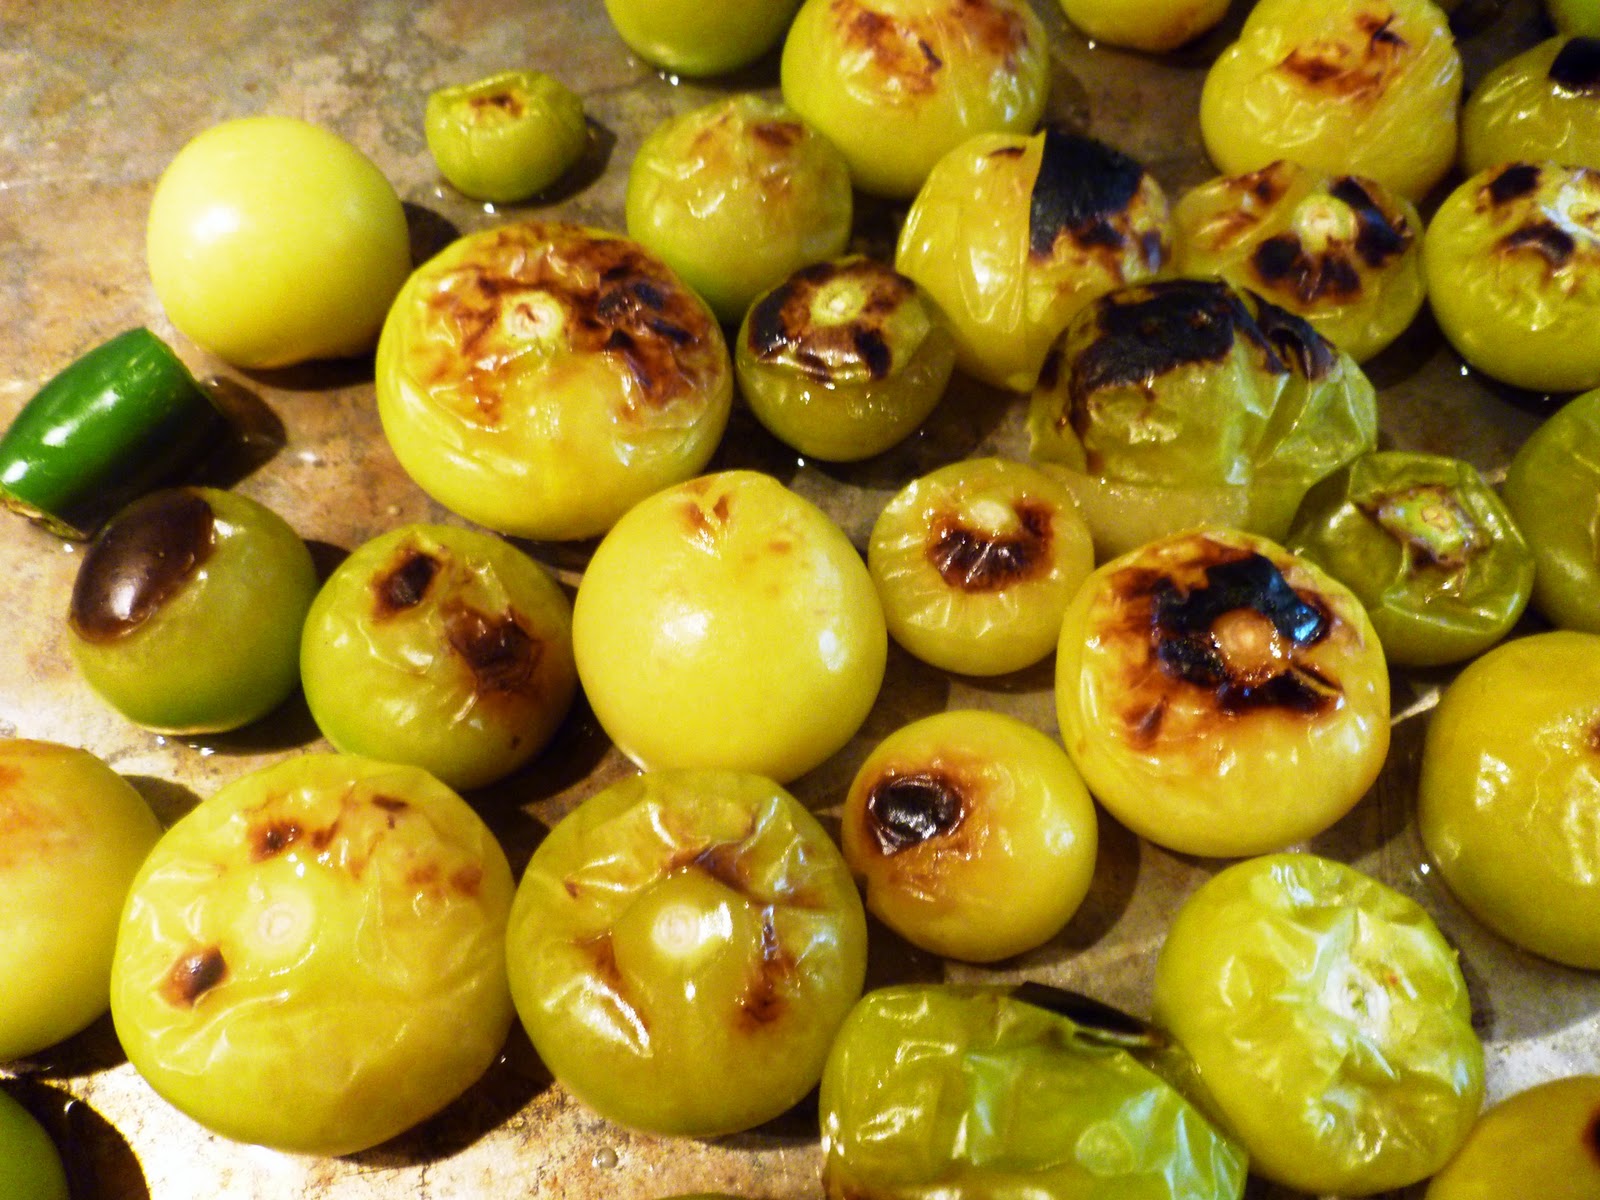
  1. Husk and wash your tomatillos well.  They have a sticky, yet surprisingly waxy, feel to their skin.  You won't get the "sticky" all off.  Put them on a baking sheet with sides.  I filled my half sheet pan (15" x 20") almost full. 
  2. Add some Jalapeno or Serrano peppers that you have stemmed.  I used 6 Serrano's, because that's what I had in my garden. 
  3. Put the pan about 4 inches away from the broiler element and broil for about 5 minutes.  Be sure to turn on a fan.  Turn them and broil 5 minutes more or until they are soft, blistered and browned (they will be burned in spots). This caramelizes the natural sugars and gives them a smoky flavor. Remove them from the oven and cool slightly. 
  4. Put the tomatillos, the pan juices, and the peppers (I removed some of the seeds and ribs from my Serrano's) into a blender.  Be judicious with the amount of peppers that you initially add.  You may want to add half and then add more later if you want more heat.  They vary on the Scoville scale from pepper to pepper, even within the same variety.  Pulse them a few times to blend. 
  5. Mince about 3/4 cup  of a white or yellow onion, put it in a strainer and rinse with water and drain. This will take some of the acid and bitterness from the onion.  Add about 2/3 of the minced onion to the blender (reserving the rest to add at the end for texture).  
  6. Coarsely chop a large handful of cilantro; again, put as much as you like in the blender, reserving some minced cilantro for finishing at the end.  I find that people either love cilantro or hate it.  I love it, but I've heard some people say it tastes like soap.  Pulse once or twice to blend the onions and cilantro.   If your sauce is not the right consistency you might thin it with some water.....
  7. OR do as I do and use a bit of chicken broth.  My tomatillos were very juicy and I didn't need to thin my sauce but I wanted the depth that chicken broth brings to the party so I added 2 teaspoons of chicken base. You could add some bouillon granules but be careful; they are mostly salt. 
  8. Adjust the seasonings to taste by adding salt and freshly ground pepper at the end.  I throw in a little coarsely chopped cilantro for color and add the remaining minced onions at the end for texture. 
*Some tomatillo salsa recipes call for garlic (which I generally love) but not in this salsa.  I think it muddies the bright citrus flavor.

That's it.  The best tasting tomatillo sauce you've ever eaten.  I made A LOT.  Some will be frozen for later (chicken enchiladas), some went into the fridge for now, and some was used for dinner.


Bonnie's "Sort Of Huevos Rancheros (Sort Of)"

I'm not sure what to call this dish.  It consists of what I had on hand. 
On an oven-proof plate, lay down two freshly warmed corn tortillas, spread some mashed black beans on top, and add a soft poached egg (or you can fry it sunny side up, but the yolk should be soft so that it runs over the beans and tortillas when broken).  You won't believe how much richness the egg adds to the dish.  Don't leave it off.  Top the whole thing with some more tomatillo sauce, and some white melting cheese (I used Monterrey Jack because that's what I had in my fridge, but Mexican cheese would be terrific).  Slip the whole plate under the broiler for a few minutes and serve with more tomatillo salsa, guacamole, some chopped fresh orange heirloom tomatoes and a dollop of sour cream.

Heaven on a plate!  This would be great for breakfast or brunch.  We couldn't wait that long, so we ate it for dinner.

This is linked to the Hearth 'n Soul blog hop.  Check out everyone's offerings this week.

Friday, August 20, 2010

Perfect Pesto

Remember back in March when I made Pesto Bread from Healthy Bread in Five Minutes A Day and I used my homemade frozen pesto.
Well, it's time to make some more.  My gardens are usually bursting with basil this time of year, and I can't make enough of it. 

Quite a few years ago when we had an abundance of basil, we made up 5 different recipes of pesto from reliable sources (Ina, Martha, among others).  This recipe won hands down in the blind taste test.  All 6 of us unanimously chose it over the other recipes.  It comes from the Foster's Market Cookbook, which is one of my all-time favorite resources.  I make batches and batches of this every summer and freeze it. I cut it in cubes and store it in freezer bags for use through out the rest of the year and then I can defrost only a large enough chunk for the recipe I'm making.  My daughters also like to raid the freezer in the dead of winter and take some back to their apartments at University after a weekend at home.

It's great on veggies, pasta, or both.  In the summer, I put the pasta on to boil and run to the garden for whatever ripe vegetables there are to be had.  Often I add leftover chicken or shrimp and I've got a complete dinner in a flash.
I use it for omelets or bread dipping.  Mix it with mayo or spread it plain on sandwiches.  One of my daughters has been caught (more than once) eating it right from the bowl with a spoon.  This pesto is so good!   It's traditional pesto; I use only pignoli or pine nuts, that I have roasted.  I've tried other recipes with walnuts and some with parsley added to the basil.  I think they dilutes the flavor and vibrancy.  Oh no, none of those other pestos will do for us!
I have not touched up the photo of the pesto.  Did you notice how vibrant and bright green it is?  It stays this color even after it's frozen.  My secret weapon?...that little white vitamin C tablet in the photo on the left.  Add it to the food processor when you add the Parmesan cheese...just one tablet per batch.  Vitamin C is just ascorbic acid (you can also add some Fruit Fresh if you have it) and it will keep the basil from darkening.  And it's good for you too!   
Another great tip...see the Parmesan rind left over after I grated my cheese (those are salt crystals on the rind, not mold and  the crystals are harmless and a normal thing on real Parmesan rinds)?
 Don't throw the rind away!  Real Parmigiana Reggiano cheese is expensive, so cut the rind into small pieces and freeze it in freezer bags.  When you are making soup, throw a frozen rind in.  The cheese will melt off the rind and into the broth.  Check the rind occasionally to see when the cheese has melted away, and then discard the waxy rind before serving.  They add great flavor to your soup. 

 Tomatoes and basil are a perfect marriage.  I use them together often.  What will you make with your pesto?

Foster’s Market Pesto
2 C. firmly packed basil leaves, washed and dried
6 garlic cloves
¾ C. extra-virgin olive oil
¼ C. roasted pine nuts
1 C. (4 oz.) freshly grated Parmesan cheese
1 tsp. salt
1 tsp. freshly ground black pepper

*optional: 1 vitamin C tablet (keeps the pesto from going brown)

Place the basil in the bowl of a food processor fitted with a metal blade. Add the garlic and pulse several times to make a rough chop.
Add the olive oil in a slow steady stream down the feed tube, with the motor running. Stop and scrape down the sides of the bowl several times.
Add the pine nuts, Parmesan, salt, and pepper and puree about 1 minute longer until the mixture is well blended and smooth.

*(Note: If adding a vitamin C tablet, add it along with the pine nuts).

Refrigerate in an airtight container until ready to use or up to 2 weeks.

You can also refrigerate this in ice cube trays. After it is frozen, remove from the trays and store in freezer bags for up to 6 months. Take out only as many cubes as you need.  I freeze my pesto in Pyrex baking pans, turn it out onto a cutting board, and cut into recipe size chunks (1 Tab. measure in an ice cube tray is not enough for my recipes).

Linked to Two for Tuesdays.

Saturday, February 27, 2010

Cinnamon Vanilla Custard Sauce (Creme Anglaise)

This is Cinnamon Vanilla Custard Sauce ( a variation on Creme Anglaise). 

Notice the beautiful black flecks of vanilla bean seed in it?  This is the real thing people!!!  The pod comes from an orchid (which explains why it is so expensive) and is grown only in 4 regions of the world.  Read more about vanilla here.


      .


To use the seeds, cut the bean halfway through lengthwise, and using the BACK of a knife blade, scrape the seeds out.  Set them aside for now. We'll use them later

Don't throw the scraped pod away.  Put it into a bowl with some granulated sugar, cover it, and let it sit for a week or so.  The sugar will absorb the vanilla flavors and you will have VANILLA SUGAR.  No need to add vanilla extract when you use it.

Meanwhile, back to the sauce.......

Separate the egg yolks (save the whites to use in another recipe; more macarons maybe?). 


Put them in a bowl and add the sugar and whip with a mixer until the sugar is dissolved the the color is lemon yellow.  It should form a "ribbon" when streamed from the spoon or spatula.  Like this:


Put this mixture into a saucepan and add the cinnamon stick and the scraped vanilla pod (don't add the seeds yet).  Cook over low heat, adding the half and half slowly, until it is thick and smooth.   You should be able to run your finger over the back of the spoon or spatula and it will leave an empty trail.  (Sorry, I forgot to take a picture of this). 

Don't let this boil.  It will curdle and break / or you'll get scrambled eggs.

Take the sauce off the heat.  Remove the cinnamon stick and vanilla pod.  Stir in the vanilla seeds and strain the sauce.  Let it cool, then refrigerate it.  It will thicken more as it cools.

Serve this with any dessert recipe.  You can also spoon it over puddings, ice cream, use it in a trifle, or moisten a cake layer.


Here's the recipe for the Dutch Apple Tart and Cinnamon Vanilla Bean Sauce (Creme Anglaise)

Dutch Apple Tart with Cinnamon Vanilla Custard Sauce

Crust:
2½ C. all-purpose flour
2 T. sugar
2 tsp. baking powder
1 tsp. salt
1 C. unsalted butter, softened and cut up
2 egg yolks
¼ C. buttermilk

Topping:
½ C. granulated sugar
1/3 C. all-purpose flour
1 tsp. ground cinnamon
¼ C. unsalted butter, softened and cut up


Filling:
8 (6 oz.) cooking apples, peeled, cored, and sliced (9 C.)

Cinnamon Vanilla Custard Sauce:
6 large egg yolks
3 Tab. granulated sugar
2 C. half and half, scalded
1 vanilla bean, split lengthwise
1 (3-inch) cinnamon stick


To make crust:
In large bowl, combine 2 ½ C. flour, 2 T. sugar, baking powder, and salt. Mix well. With a pastry blender or 2 knives, cut in 1 C. butter and egg yolks until mixture resembles coarse crumbs. Gradually drizzle buttermilk over crumb mixture, tossing with a fork until all is moistened. Gather dough unto a ball. Flatten into a large disk shape. Press crust on bottom and halfway up sides of 9-inch spring form pan. Cover and set aside.


To make topping:
In a small bowl combine ½ C. sugar, 1/3 C. flour, and cinnamon. Mix well. With pastry blender or 2 knives, cut in ¼ C. butter until blended to size of peas.

To make custard sauce:
Beat yolks and sugar at high speed until thick enough to form a ribbon (about 5 minutes). Slowly beat in half and half at low speed. Pour into a saucepan. Add vanilla bean and cinnamon stick. Cook over Medium-low heat, stirring constantly, until mixture thickens and coats the back of a spoon. Do not boil. Strain into a bowl. Scrape vanilla bean seeds into custard. Discard cinnamon stick and vanilla pod. Press plastic wrap directly on surface of custard. Cool to room temperature, about 2 hours. Serve at once or refrigerate.


To assemble:
Preheat oven to 350° F. Pile apple slices into crust, mounding high in the center and allowing apples to extend above the crust on sides of pan. (Apples will settle during baking). Sprinkle apples evenly with topping. Place pan on baking sheet. Bake for 1 ¼ hours until topping is brown and apples in center are tender. Cool in pan set on rack. Remove sides of pan.


To serve:
Cut tart in wedges. Serve with Cinnamon Vanilla Custard Sauce.