Heaven on Earth

Heaven on Earth
Showing posts with label Decor. Show all posts

Friday, August 29, 2014

I'm still here...just busy. Wallpaper, paint, and repairs.

 It started with me doing this...to the living room, the entry staircase, the upstairs hall, and the dining room.
Almost twenty years ago we had wall paper installed and I was ready for a change.
One paper steamer and a lot of vinegar/water and elbow grease in essentially what is 4 separate rooms and I was ready for the painters to work their magic.
 Most of the furniture went to the garage and the family room; dishes and sets of crystal into boxes...do I really have that much dinnerware?  Yep, seems the sideboard holds A LOT and that necessitated a trip to the second hand store to donate some of those accumulated items. 
Some help from Brooke, Nate, and Abby with last minute stripping paper and moving the heavy pieces which were the table and the sideboard in the dining room...
 and the grand piano in the living room...
the family room got the miscellaneous stuff like the paintings, the piano bench, assorted side tables and chairs, and the draperies.
The painter assures me he'll be finished by the holidays; Halloween, not Thanksgiving.  Thank goodness.
So I'm still here, just not "here" on the blog much.  Oh, and did I mention I'm knee deep in remaking a wedding dress for a dear friend?  See you soon (I hope).

Thursday, March 6, 2014

Easter bunnies...off the needles

I've been away longer than I planned on.
 I've been teaching the Little Cotton Rabbits class again at The Wool Cabin; just in time for Easter.
Here's the dress for the Dutch Bunny in the yellow and white striped tights.  It's almost dry and then it will get a button and a seam up the back.
I made another little Lambie.  She's slightly different than the last one and off to a new home soon.
I have made over 30 of these little stuffed toys.  I think I might have an obsession.

Thursday, December 5, 2013

The stockings were hung....

 The stockings were hung (minus one) by the chimneys with care.

 Did you know you could knit with fabric strips?  You can.

I'm not even worrying about St. Nick yet.  There's more decorating to do.

Thursday, September 5, 2013

Wheewww...on to other random things.

The weddings over.  It was fun having the girls all together.
Their bridesmaids necklaces were darling.
The garden is overflowing with tomatoes of all shapes, and kinds. 
So or course we made bacon, lettuce, and tomato sandwiches. 
I made sloppy joes for the family party on Saturday.
And made up one of the pair of socks.  I've got a start on Christmas gifts.
and speaking of Christmas....
The petite point sock from "you know where" is finished.  It's off to the finishers today with B's sock that I finished last year.!
Hallelujah!...I'm singing the whole aria, not just the chorus.


Monday, July 15, 2013

Vintage Quilts and more Road Trip Souvenirs.

We've been on a road trip.  B, Abby and I went to Montana, Idaho, and Washington.  It's a good thing we had the car...so many "souvenirs" to bring home!
This little basket quilt circa 1860 is a cousin to large 1850's Ohio basket quilt with the saw tooth border (below)


that we bought many years ago.  Same era, style and similar colors.  I loved the oak leaf appliqued vine around the edges of this one.  Rebecca's Antiques in Hailey, Idaho west of Sun Valley Resort is not to be missed.  She's only open two weekends of the year but well worth the trip.

The Hailey antique fair yielded two more linen/flax European grain sacks for our collection.  We were thrilled to find this one with both the Mr.s and my monogram.  How could we leave this one behind?
 It's amazing to me that a farm woman spent so much time making this beautiful eyelet by hand for the rope to go through.  What amazing workmanship for a farm implement.  Just look at the two different colors of twine woven together for the closing rope.

MaryJane Butters (of MaryJane's Farm fame) has a retail store in Couer d'Alene Idaho.  I couldn't resist bringing home the metal calendar or the blue gingham sheet sets.  


My husband lived in Germany for several years and he brought home a sliding wall calendar that hung in our families' mountain cabin.  The girls used to love sliding the dates on that calendar.  It was how we could tell when we had visited the cabin last.  This is a new version of that calendar for the Homestead.  I think it will be fun for the next generation of little visitors to flip the dates on this one.

Last week was spent getting the fallen tree cut up.  Now I'm off to sew bridesmaid dresses.  It's good to be home....Lot's to do!

Monday, April 1, 2013

Spring ..sort of.

Here's the Granary on Easter Sunday.  The day started out warm and sunny; then it rained. The girls and their friends came to the Stone House for dinner and then they dyed some Easter eggs.
The poppies are starting to green up and we got the beds cleaned up and ready...again.
I hung my new spring wreath.  It has things I have collected from the yard on it, except the forsythia (shh....they're silk, from the craft store).  I took the white bird feather off as I think it is too stark.  I am waiting for some pussy willows and when I find them, they are going on the wreath too.
A few weeks ago, when I was pruning the bushes in the Granary garden I found an abandoned hummingbird nest with two tiny un-hatched eggs among the broken, hatched shells.  I shellac-ed the nests and eggs and babied them for a week.  I didn't want to break those eggs.  Then Oops...I dropped the glue gun on one when I was gluing the nest to the wreath so now there is only one egg left.  Can you see it in the nest?
Sweet Rachel (who stayed with us on Thursday nights) is done with her nursing clinicals in our city for this semester.  She left a parting gift.  Aren't they lovely.  After a weekend of yard work and tree pruning, it's nice to have a bright spot in the house.

Hope you had a Happy Easter weekend.

Monday, March 25, 2013

Neck roll Cover Tutorial

I love my new striped neck roll covers.  I made two different covers for my rolls, the blue striped ones to match the Delectable Mountains quilt with the hand appliqued berry border and my other blue quilts and a pair of pink covers to match the antique1850's applique quilt and the 1840's Ohio basket quilt.  There are plain white goose down pillows inside the rolls.  I like to be able to change the quilts and pillow shams now and then for variety.  I have quilts in all the bedrooms at the Stone House and I like to change them arpound and display a few of them at a time.


Here's how to make the removable round pillow covers:

Measure the round pillow you want to cover:
  • First measure the circumference of the circle (that means measure around the width of the roll, perpendicular to the stripes). My neck roll was 28" around.  Now measure the length from one long end of the pillow to the other (parallel to the stripes).  My roll measured 22" long.  I wanted my pillow to fit snugly and fill out the case so I didn't add seam allowances to those measurements.  Cut out 1 rectangle of fabric to the exact measurement of your roll (for my case, 22" x 28").  
  • Now measure the two ends of the roll. You need to find the radius of the end circles.  The diameter is found by measuring from one side of the end to the other.  Now divide the diameter by 2 to get the radius of the circle.  I must admit my geometry terminology needed a bit of a dusting off.  The radius of my roll was 4" (half of the end circle measurement). You will need to add a 11/4" to the radius measurement for the seam allowance for the casing.  You will be threading a piece of ribbon through the casing to close up the ends of the roll after inserting your inner pillow.  I cut 2 rectangles of fabric 28" (the circumference of the circle: see above) x 5 1/4" long.  
I cut two rectangles 28" x 5 1/4".  These are the ends of the cover.
I cut one rectangle 28" x 22".  This is the main body of the cover.
2 lengths of ribbon for ends; I cut 2-36" lengths of 1/2" wide ribbon.  
Optional piping: two pieces of trim each measuring the same as the width of the roll (28" each in my case). 


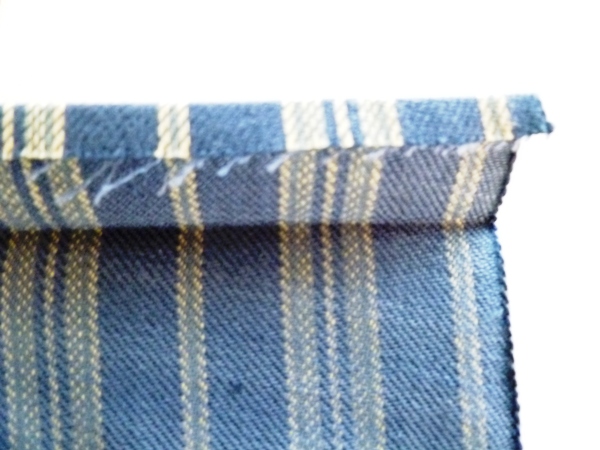
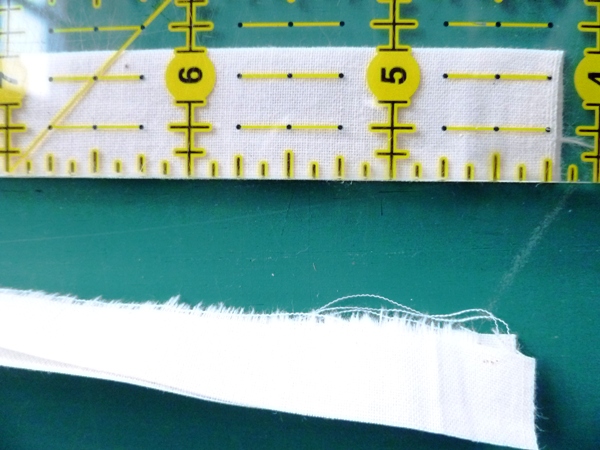
  • Along one 28" side on both end pieces, press 1/4" under to the wrong side.  Now press the 1/4" hems under another 1" on both end pieces. Each end piece will have one 28" side that is not hemmed and a side that looks like the photo above.  Do not sew the hems down at this point.  Once stitched, the hems will form the casings for the ribbon ties.NOTE:  The casing seam allowance must be twice the width of your ribbon ties plus 1/4" turn under.  If you use a ribbon that is a different width than 1/2" ribbon, you will need to adjust the casing and hem measurements .
  • If using trim or piping, place the raw edges of the piping to the  short end (28" in my case) of the main fabric piece, right side of the fabric facing up.  Pin the piping in place.  Baste the piping to the main rectangle (longest side) by sewing directly over the piping stitching. See photo above.
  • With right sides together, pin the piped end of the rectangle to the unpressed side of the end piece.  The piping will be inside the two rectangles and the hem will be toward the middle, underneath.  Place the main body piece with the piping stitching side up (see photo above), so that you can see the basting stitches of the piping.  These stitches will be your guide.  With a shortened stitch length (not basting length), adjust your machine needle and stitch just left and inside the previous basting stitches, close to the piping but be careful to not stitch into the cording.  In the photo above, you can see that the needle is slightly to the left of center of the cording foot, putting the new stitching just left of the previous basting stitches.  This will ensure that you get even width piping and that you won't see the basting stitches on the right side of the cover after turning it right side out.
  • Repeat with the other end and press the seams open.  Trim 1/2" off the ends of the cording inside the piping.   This removes the cording from the seam allowance and reduces bulk.

See my previous post for tutorial on making your own piping.

    Now you have one long rectangle with 2 rows of piping between the main body and the end pieces.
     The pressed  hems should be opened and un-stitched on each end at this stage.

    • Open out the hems and fold the rectangle right sides together lengthwise. With the casing hems opened flat, measure in 3/4" from one end and make a mark (I the middle pin for this mark).  Then measure another 1/2" toward the middle from the first mark and make another mark (far right pin).  You will not stitch between the middle and bottom pin.  Repeat for the other hem.  This 1/2" area between the marks will be left open  for ribbon casings on each end.  
    • Starting at one end, stitch 3/4" in and backstitch.  Cut your thread.  Skip the 1/2" between the marks and at the next mark, backstitch and continue sewing down the edge of long side until you reach the next mark (1 1/2" from the end of the roll).  Backstitch at the mark and cut your thread.  Skip the 1/2" area between the marks and backstitch and sew to the end of the cover.
    • Press the long seam open.
    • Turn the cover right side out. 
    • Turn the pressed hems under to the wrong side to form the casings.  You should have an opening on the right side of the fabric to thread your ribbon through.  
    Stitch the hems all the way around on each end , forming casings on both ends of the cover. 
    You can see the casing  opening in the photo below (where the scissors are inserted).  This is where the ribbons will be threaded.
    • Insert a large safety pin into one end of each ribbon and thread your ribbons in the casings.  Insert your pillow form and pull the ribbons tightly.  Tie the ribbons in a square knot and then in a bow.  
    • Trim the ends of the ribbon and apply Fraycheck to the ribbon.  *Don't trim your ribbon ends short as you will need to be able to extend them out to remove the inside pillow for laundering.
    We have quite a few more quilts in our collection so I'm on the lookout for cute fabrics to make more cases for other beds with quilts.

    Come back in a bit and I'll post a tutorial for making continental pillowcases with envelopes.  I like them because the make a nice compact case that your pillows won't slide around as much a standard cases.  They also like neat and tidy on the pillows.  And I can make them to match my other bed fabrics, which is sometimes hard to do with purchased pillowcases. Linked to Tutorials and Tips

    Wednesday, March 13, 2013

    Make Your Own Piping

    You might remember this post on neck roll pillows last week.  I made my own piping and promised a tutorial on how to do it.

    I never use packaged piping as I like to customize the color and fabric of my piping and I tend to use smaller cording than in the packages.  I used a green micro print for the neck rolls below to coordinate with the green in the circle fabric.
    It's easy to make piping and making it saves money.  I can also vary the size of the cording (thread) inside the piping depending on my project.

    Here's how I make it:


    • First purchase cording or string the diameter that you desire your piping to be (this determines the fabric width that you will cut).
    • Roughly tear or cut a strip of fabric twice the width of your seam allowance plus the diameter of your cording.  I add another 1/2" to that measurement so I can trim it after I fold it in half and press it.  I can be most accurate by doing it this way.  Press the fabric strip in half with the right side of the fabric facing out.

    (My seam allowance is 1/2" and my cording diameter is about 1/8", so the total width I need for my piping is 5/8"). But remember that the piping is folded so you need to double that finished measurement.  I needed a flat width of 1 1/4" wide.  I added another 1/2" to that measurement and I trimmed it off 1/4" from the raw edge after pressing, leaving my finished folded strip 5/8" wide.
    DO NOT TRIM FROM THE FOLDED EDGE BUT THE RAW EDGE.
    If you are a very accurate presser than I , you can just cut your strip to the final width doubled the first time.

    • Attach a cording foot or zipper foot to your machine and set the stitch length at a basting length ( I use a 3.5 stitch length on my machine for basting and I sew with a Pfaff sewing machine).While a zipper foot works fine, the cording foot is even better for making piping.  It allows the cording to ride in a groove, keeping the cording in place as you baste. Cut a piece of cording or string slightly longer than the fabric strip and insert it inside and against the folded edge of the strip.  I use a cording attachment but you can also use a zipper foot.
    • Place the cording in the groove just left of your needle or to the left of the zipper foot.
    Your stitching should be close to the cording but leave enough space between your basting stitch and the cording so that you can sew your final seam just inside the basting thread against the cording.  (I have an adjustable needle in my machine and I set the needle one setting to the left for the final seam).

    • Baste the enclosed cording inside the piping.
    • To sew the piping onto fabric, put the piping onto your pattern piece with raw edges aligned.  Stitch on top of the basting stitch on the piping using a basting stitch again.  This will anchor your piping so that you can make the final seam stitching the piping down.  Shorten your final stitch length to a sewing (not basting) length.
    • After basting the piping in place, put your second piece of fabric right sides together against the first piece and pin the piping inside the two pieces of fabric.  I turn the piece of fabric with the piping  attached to the top side, facing me.  I put the fabric without the pipin on toward the face plate of my machine.  This way I can see the basting stitch that is already holding the piping in place.  I then move my needle one setting to the left and stitch just left of the basting stitch, close to the cording. I can be sure that the basting stitch will be hidden when the fabric is turned right side out.

    Tip:  After basting the piping to your fabric (see above photo) and before stitching your final seam, pull cording equal to your seam allowance out from the end of each side of the piping strip. Cut both side pieces of cording away and discard (1/2" in my case because I used a 1/2" seam allowance). 
    Now pull the gathered up fabric strip to the right, letting the cording slide back inside the piping strip.  The cord is now 1/2" away from end of the piping and the cord is inside the piping strip.  When you sew your final seam there will be no cord in the seam allowance, thus less bulk.  Do this on both sides of your piping before sewing side seams and your seams will lay flat without the cording in the seam allowance.

    *I piped seams that were on the straight-of-grain, so I cut my fabric strips for my piping on the straight-of- grain.  If you are piping a curve, make your piping the same as directed above, but cut your fabric strips on the bias grain line.  Bias curves more than straight grain lines and lays nicely around curved pieces.

    I hope you'll come back for a tutorial on making the neck roll covers.

    Now go and make some piping.  It's a great sewing skill to master and it will make all your piped projects look custom made and professional.