Heaven on Earth

Heaven on Earth
Showing posts with label Lunch. Show all posts

Monday, February 24, 2014

Sloppy Joes...or the best comfort food for a crowd.

B's favorite sandwich is a Sloppy Joe that I have been making our whole married life.  It's one of the two few good recipes I brought into our marriage.  I am not kidding; I was a terrible cook.

This recipe has a family connection. When I was very young, our church had a "round-the-block" parade every July, the anniversary month of the date our pioneer ancestors migrated to our state.  The children dressed like pioneers and decorated their little red wagons like covered wagons.  Some of us festooned our bicycles with crepe paper streamers and put playing cards on our spokes and we walked and rode "around the block".  We were little after all and couldn't walk very far.  Neighbors came out to their yards to cheer and clap (they were nice to little kids).  Afterwards, we gathered on the church lawn and had lunch, which was always Sloppy Joes, homemade root beer, and popcorn balls.  There must have been other food items served but those were the my favorites. This recipe has been an extended family favorite ever since.  I posted a photo on the blog here, but didn't give you the recipe.  And you need the recipe...trust me.
Once a month I'm in charge of feeding several hundred young single adults after our Sunday services. B requested this meal.   It can be a challenge to make something good to eat for that large of a crowd.  We feed between 150 to 190 people each month.  I also try to make something that can be "stretched" into extra portions if necessary and this recipe is perfect for a crowd and can be portioned easily.
These Sloppy Joes were a hit at the Mingle.  We served second helpings and even quite a few thirds.

You'll see that this recipe has a version that feeds 80 people.  I told you it's original to the Parade.
For my family I make the small version but for the mingle I doubled the 80 serving version to feed 160 people.  You choose the size that's right for your gathering.  You can see what 160 servings looks like below.  The black soup pot is a 10 quart size.
As with many recipes, this one is best made ahead to give the flavors a chance to "meld".  It freezes well too.

Round-the-block Parade Sloppy Joes

For 16 buns:                                                                 
2 pounds ofground beef                                                             
2 medium onions                                         
1½ cups of ketchup                                                      
1 teaspoon of granulated sugar                                                          
½ teaspoon of curry powder                                                       
½ teaspoon of chili powder                                                         
2 bay leaves                                                          
1 cup of tomato juice


For 80 buns:
10 pounds of ground beef
10 medium onions
7 ½ cups of ketchup
teaspoons of granulated sugar
2 ½ teaspoons of curry powder
2 ½ teaspoons of chili powder
4 bay leaves
cups of tomato juice

Brown hamburger and drain grease.
Combine all of the ingredients in a large heavy pan.
Simmer for at least 1 hour, stirring and checking mixture occasionally to make sure that the pot doesn’t boil dry.

Serve on buns.
This freezes well.  It is actually better if made one day ahead and refrigerated and reheated.

Monday, November 4, 2013

The Saga of the Secret Ingredient.

Once upon a time, our sweet elderly neighbor left some fudge on our porch.  She liked to surprise us with food gifts. Ever hopeful, the girls took a small bite.  You see, Julie was a bit eccentric and had a fascination for recipes with strange ingredients (think tomato soup cake).  What ensued was not a pretty sight.
Surprise (not really)...the fudge was unpalatable.  

I called Julie to thank her.  The gesture was lovely and so was her intent.

"Guess what I put in my fudge", said Julie.
"I can't imagine", said I.
"No really, guess the secret ingredient", she prodded.
Umm....."Marshmallow creme? Cocoa powder?"  "I just don't know", said I.

"VELVEETA CHEESE!", an exuberant Julie exclaimed.  "I knew you'd never guess".
Having related to you this true story, I am now telling you I add a secret ingredient to all of my chili recipes. You will be relieved to now it is not Velveeta Cheese.
Unlike the Velveeta Fudge incident, your quests will be clamoring for more of this dish.
Did you guess a Hershey kiss?

Just one will make your chili sing with flavor.  Pop it in the pot and let the sweet chocolate melt down into the pot.  Stir well to blend.
Unlike chocolate and Velveeta cheese, chocolate and chili are perfect companions. You'll also have a big bag of the chocolate left over to nosh on.  How bad can that be?

I like to top my chili bowl with a dollop of sour cream, some chopped scallions and a sprinkling of grated sharp cheddar cheese (when I don't forget to bring the cheese and scallions home from the Stone House).
You can garnish your bowl however you like.

I started with this recipe, then I decreased the chipotle chili powder by half.  We don't like our chili too smoky or to have too much "heat" from the chili.  I also left out the beer and I added yellow, orange and a green bell pepper for color.

Perfect for chilly Fall (or winter) evenings.   It's snowing again here.  I might have to dish up another serving for lunch...while wearing my wool socks and a large sweater.

As with most chili, this one gets better after a day's rest in the refrigerator.  I doubled the batch and stashed some in the freezer. 

Thursday, October 3, 2013

San Francisco Deli Salad

Years ago we were in downtown San Francisco with the girls.  It was lunchtime and we stopped in at a little little take-out deli (wish I could remember the name).  One bite of this salad and we were all in love.  The flavors of sun-dried tomatoes, tuna, pasta and capers all covered in tangy balsamic dressing were a winner. Poor Erin, she shared most of her lunch.  We all wished we had picked her salad.  As soon as we got home, I recreated it.  

It's not the most beautiful salad I've ever made but it's one of the most flavorful.  With just 5 or 6 ingredients it might be the simplest but don't let the easy preparation and number of ingredients fool you.  It's so good you'll want to make it again and again (we do).

It easily packs in a lunch bag or box and it only gets better after a day in the refrigerator.  Best of all, you probably have all of the ingredients already in your pantry and fridge.

I give you the San Francisco Deli Salad...by way of City Home/Country Home.  One of the best things we ever brought home from a vacation.


San Francisco Financial District Deli Salad
            Inspired by a take-out salad eaten while on vacation

1 pound of pasta, like rottini or penne
½ cup of  capers , drained, rinsed, and chopped
½ cup of  black olives, chopped (optional)
1 can of water packed albacore tuna, drained
¾ cup of sun-dried tomatoes, chopped (if using oil marinated tomatoes, drain well)
1 recipe (or bottle) of balsamic vinegar salad dressing

Cook pasta and drain.  Toss the pasta in a salad bowl with the next four ingredients.  Pour dressing over the salad and toss to coat.  Use as much dressing as you need to flavor the pasta.  Let it marinate for several hours or overnight before serving.


Serve cold.

Wednesday, April 17, 2013

Smitten...with caramelized onions.

One of my daughters gave another daughter the Smitten Kitchen cookbook for Christmas.  It has great photos and the recipes are good.  I wouldn't say really "gourmet" or difficult to make, but that's a good thing.  Not every cookbook has to have difficult recipes.  These are good for quick, easy dinners

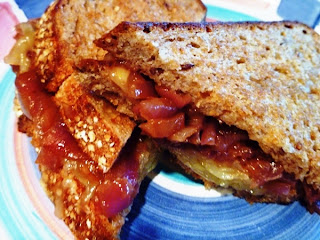
We love caramelized onions at our house and the recipe in Deb Perelman's book is easy and good.  Probably not everyone needs a recipe to make these (they are exactly like the ones I make) but they are GOOD!  I have never put them on a grilled cheese sandwich so thanks Deb.
I made up a double recipe and put them in the fridge for later.  They were delicious on this simple grilled cheese sandwich.  I served them with my favorite lentil soup recipe.  You can find it here.  Soup and sandwiches; perfect for our chilly spring weather.

I made a few modifications on the Smitten Kitchen sandwich.  I sliced a hearty multi-grain bread and buttered the outside of the slices.  I spread a good mustard on one slice of bread.  Pile on the onions, top them with a big handful of grated Emmental cheese (or any other cheese that you like) and let the cheese melt and the bread get toasty golden brown in a medium hot skillet.   MMM....
Caramelized Onions

1 Tablespoon olive oil
1 Tablespoon of butter
1 large red onion, halved and sliced thinly
2 teaspoons of brown sugar
1/4 teaspoon of salt
1 Tablespoon of balsamic vinegar
freshly ground black pepper

Heat the oil and butter and add the onion.  Saute for 5 minutes.  Add the brown sugar and salt, lower the heat and cook for 10 minutes more on medium heat.  Add the vinegar, and stir and simmer for another 2 minutes, or until the mixture begins to thicken.  Season with black pepper and more salt if desired.  Store in the refrigerator for up to 5 days.  

Add these to sandwiches, hamburgers or egg dishes.


Monday, March 11, 2013

Colorful Coleslaw

Spring is starting to creep in here.  Just a day ago it was sunny, not warm mind you,but sunny.  My dinner ideas start to turn to fresh and light after the heavy comfort foods of winter.

I have to insert a disclaimer about now.  I AM NOT A FAN OF COLESLAW...except this recipe.  I really hate the mayonnaise based ones and let's not even talk about how dangerous mayonnaise based salads are if left out of the fridge on a hot summer day.
If my plate arrives in a restaurant with coleslaw on it it promptly get passed to my husband.  
But years ago (I won't say how many), when I was a young newlywed, we helped host a party for a large church group.  I was assigned coleslaw and happened upon a version of this recipe in the newspaper.
The original recipe called for green cabbage; I like red.  I added some carrot and a few spices.  It also called for plain old white vinegar.  I never make this with white vinegar.  In fact, it's a great venue to experiment with gourmet vinegars or your own homemade ones.

If you use green cabbage, add with some chopped green onions for color and maybe a fruity vinegar.  You're only limited by your imagination and cabbage is inexpensive.  Start your experimenting with a half-batch.  Of course, the recipe I've provided below is absolutely scrumptious the way it's written.

This salad needs to marinate in it's dressing for at least 12 hours; 24 is best.  It will retain it's crunch for several days so the leftovers are great.  I'm going to experiment with heating it up and see how I feel about that.

Best of all, it's good for you;  cabbage is packed with nutrients.  Most of the sugar is in the brine and drains off before serving.  
On a plate as a side salad or piled high on a pork sandwich, this slaw can't be beat.


Coleslaw
1 medium head of red or green cabbage (firm, not Chinese), julienned 
¼ cup of yellow onion, minced
1 large carrot, peeled and grated
Chopped scallions for garnish (optional)

Dressing:
1 ½ teaspoon of Kosher salt
1 teaspoon of dried celery seed
½ teaspoon of dried ground yellow mustard
¾ cup of granulated sugar
1 cup of vinegar (red wine, cider, balsamic, or white wine)
½ cup of canola oil (or any mild tasting oil)

Put the dressing ingredients, except for the oil, into a small saucepan and bring them to a rolling boil.  Stir to melt the sugar and mix in the spices.  After the sugar is dissolved take the mixture off the heat and slowly whisk the oil into the dressing. Set the dressing aside to cool slightly while you assemble the salad.

After the dressing is made, layer the cabbage, carrot, and onion into a large bowl.
Drizzle the warm dressing over the vegetables, tossing so that all of the vegetables are lightly covered.
Cover and refrigerate for at least 24 hours. Stir occasionally to redistribute the dressing.

This salad serves 8 to 10 people generously.


Monday, September 17, 2012

Chicken Tarragon Salad

The perfect late summer salad.  It's hearty and sweet and just right for entertaining or a lunch with family.   One of my favorite salads of all time.

Tarragon Chicken Salad with Apples and Grapes

6 cups of shredded cooked chicken
3 ribs of celery, diagonally sliced
1 cup of red seedless grapes, cut in half
1 tart apple, cored and thinly sliced
1 ½ cups of Tarragon Mayonnaise (recipe follows)
3 Tablespoons of chopped fresh Italian parsley
Salt and freshly ground black pepper to taste

Combine the chicken, celery, grapes, apple, mayonnaise and parsley in a large bowl and stir to mix. Seasonwith salt and pepper.
Arrange on a platter and garnish with parsley and celery leaves if desired.
Serve immediately or refrigerate.

This salad keeps well for several days. Add the apples and grapes just before serving.

Tarragon Mayonnaise
1 cup of good quality mayonnaise
3 Tablespoons of Tarragon Vinegar
Juice of 1 lemon
½ cup of tarragon packed in vinegar
     or ¼ cup or dried tarragon soaked in the 3 Tablespoons of vinegar
     or ¾ cup of fresh tarragon leaves chopped finely
1 shallot, minced
Salt and freshly ground black pepper

Place the mayonnaise, vinegar, lemon juice and tarragon leaves in a food processor fitted with a metal blade. Process until well blended.

Add the shallot and blend until smooth. Season with salt and pepper. Refrigerate until ready to use or up to 1 week.

This is also good on sandwiches or sliced tomatoes.

Monday, June 25, 2012

Garden to Salad...Butter Crunch Lettuce Cobb Salad


Pick one fresh butter crunch lettuce head (or buy lettuce at the market).  Rinse three times in clean water in a clean sink and spin dry.  Tear into bite-size pieces.
Cut up tomatoes, eggs, avocado, bacon, carrots, smoked chicken, cukes, snipped chives and snow peas.  Throw in a tiny bit of blue cheese and layer all with the lettuce.  Sprinkle with sea salt and fresh ground pepper.  Toss with Brown Derby Dressing.

Brown Derby Dressing
(from the original Brown Derby restaurant...the inventors of the Cobb salad)

½ cup of red-wine vinegar
1 ½ teaspoon of freshly ground black pepper
1 ½ teaspoon of granulated sugar
1 ½ cup of mild tasting salad oil (canola)
1 tablespoon of fresh lemon juice
1 teaspoon of kosher salt
½ teaspoon of dry mustard
1 clove of garlic, minced

Mix and refrigerate several hours before serving.


Saturday, February 25, 2012

Leftover Roast Chicken?

That roast chicken from last week...gone in a flash. The portion that wasn't eaten was sent home with the daughters for a quick after-class meal. The only "leftovers" was the carcass.
I used it to make soup and it just might have been better than the original roast chicken meal.
No recipe because you don't need one.  Forage in the refrigerator and pantry and go to town!  Here's what I did:

Put the refrigerated chicken carcass in a pot and covered it with cold water.  I scrubbed a carrot (no need to peel) and a stick of celery and chopped them into large chunks; washed an onion and put half of it into the pot, skin and all.  The skin gives your broth a beautiful golden color.  You'll be discarding these veggies, not eating them.  They're for flavor only.  Add a small handful of whole black peppercorns and let the carcass mixture simmer for 1 hour, straining off the foam as it develops. 

 I don't add salt at this point.  Remove the carcass to a plate, strain the stock, discard all of the solids and rinse out your pot.  Pick the chicken meat from the carcass, put it back into the pot, and throw that poor naked carcass out.  It's finished; gone; done; it's "given it's all" and worked every last bit of magic it has in it.  Skim off some of the fat from the stock and put it back into the pot with the chicken meat.

Now go back to the refrigerator and get another couple of carrots and some celery (I used just one rib).
Wash, peel, and chop them into bite-size pieces.  Put them back into the pot along with a 1/2 cup of long cooking barley (if you use short cooking barley, add it near the end or it will be mush).  Simmer the soup for about 20 minutes or until the barley is tender.  I had some Napa cabbage and some fresh baby spinach so I chopped them and added them to the pot.  Taste the broth and add salt and freshly ground pepper as desired. Let the soup simmer for 10 minutes more to wilt the spinach and cabbage. 

SOUP HEAVEN!  Simple, clean flavors; the stock was the star but the veggies were tender and sweet and the barley added substance.  I could have eaten bowls of this soup but one bowl was all I needed.

Now that's what I call "Leftovers".


Thursday, October 13, 2011

Stuffed Bell Peppers

Stuffed bell peppers are comfort food; plain and simple.  Nothing gourmet about them. 


This is my variation on a recipe from the old Betty Crocker cookbook that I was given for my birthday wayyyy.... back when I was in high school.  Betty Crocker's was only cookbook my mother ever owned while we were growning up.  And while I own hundreds of cookbooks now (once my wooden bookcase which housed them collapsed because they were so heavy) this particular recipe remains a favorite with my family.  They can smell this dish baking and the peppers get soft and sweet, the tomato sauce is tangy, and the cheese gets all ooey-gooey and melty.  They're not fancy, but served with a crusty loaf of bread or a simple green salad they are just the ticket on a cool fall evening.  I discard the stem of the peppers and chop the tops and put them in the freezer for other uses but you could bake the tops and set them on top of the cheese for a pretty presentation. 

The smell of these baking will have your family asking over and over again, "When do we eat?"
*They are a great make-ahead or freezer recipe too. I keep a pan there for dinner emergencies.
Stuffed Bell Peppers

6 large green peppers, cleaned with the tops cut off and membrane and seeds removed
1 pound of ground beef
¼ cup of chopped yellow onion
½ teaspoon of kosher salt
1/8 teaspoon of garlic salt
1 cup of steamed rice, brown or white
15 ounces of tomato sauce
¾ cup of shredded Monterey Jack cheese

Preheat the oven to 350º F.

Slightly cook the peppers by steaming or microwaving for 5 minutes (for either method). Set aside.
Brown the onions and ground beef until the beef is cooked through. Drain the fat and put the mixture in a large bowl. Stir in the rice, ¼ cup of grated cheese, salts, and 1 cup of the tomato sauce. Stir to mix. Heat the mixture either in the microwave or in the pan you used to brown the beef.

Stuff each pepper shell with the beef mixture and stand upright in an ungreased baking dish. Pour the remaining tomato sauce over the peppers. Cover with aluminum foil and bake for 45 minutes. Remove the foil. Sprinkle the remaining grated cheese over the top of the peppers and return to the oven and bake for 15 minutes.

Do-Ahead Tip:
Reserve 1/3 cup of the tomato sauce and remaining cheese and pour the rest of the sauce over the stuffed peppers. Cover with foil and cook for 30 minutes. Let cool and refrigerate the peppers, reserved tomato sauce and grated cheese no longer than 24 hours ahead of time (or freeze for 3 months). When ready to serve; remove from the refrigerator or freezer and put in a preheated oven at 350 degrees F. and cook uncovered for 35 minutes. Sprinkle with grated cheese and bake just until the cheese is melted.

Wednesday, October 5, 2011

Fall Harvest Beef Soup

I should be making something "Halloween-ish".  But I didn't.  I made this instead.
Just a few weeks ago the landscape looked like this...
Last weekend it looked like this...

And
today it is raining and the high daytime temperature is 48 degrees F. 

So I made soup.
Not just any soup but Harvest Soup.  It's full of root vegetables, beef, tomatoes, squash, and the secret ingredient...wait for it...an apple.  You heard me right; an apple.  Don't be tempted to leave it out because it lends just a bit of tartness.  You can't see it or isolate the flavor in the soup but it's so good.
You can use leftover beef or use one of the preparations for it below.  This sou[ is even better the next day, which is a good thing for us because the forecast is for even colder weather tomorrow.
Fall Harvest Beef Soup

3 medium potatoes, cubed
3 carrots, sliced
1 sweet pepper, cubed
1 medium yellow, onion cubed
2 stalks of celery, sliced
1 small sweet potato, cubed
¼ lb. of brown mushrooms (porcini), sliced
1 zucchini, sliced
¼ head of green cabbage, sliced
1 small apple, cubed
1 ½ cups of green peas (or 1-14 oz. can, drained)
1 ½ cups of corn kernels (or 1-14 oz. can, drained)
64 oz. of tomato juice or vegetable juice
4 cups of water or 4 cups of beef broth (in addition to the meat drippings)
1 ½ lbs. of chuck roast, cut into 2 inch cubes with fat removed (*May use leftover roast beef as well.     Just increase the beef broth in the soup by 1 cup.)
1 Tablespoon of dried basil
1 teaspoon of dried oregano
2 teaspoons of freshly ground black pepper
1 Tablespoon of kosher salt (may add more of less to taste)

Cook roast with the onion and 1 cup of beef broth either in the oven for a few hours or in a pressure cooker. If using a pressure cooker, follow instructions on the cooker. For roast, braise at 350º F. for 2 hours. Save broth from either method to add to the soup. Remove any fat still on the meat after cooking and discard. Set the beef aside.

Put all ingredients except the beef and drippings into a stock pot and simmer for 1 hour. Add the beef/drippings and simmer for 30 minutes more. Adjust the seasoning.

Serves 14-16 people.

*You may add any vegetables that you have in your garden or refrigerator. This is a great recipe for odds and ends. You may add fresh tomatoes in with the tomato juice.

Linked to Turning the Table Thursday

Sunday, September 18, 2011

Zucchini Pancakes

Our neighbors Lothar and Anita grow the most beautiful garden. Every summer Lothar tells me about his wife Anita's zucchini pancakes.  I don't know what Anita puts in hers but I decided to try making my own version.  I had some pepper jack and Parmesan cheeses in the fridge, some Panko bread crumbs, and 1/2 of a cut onion.

I grated my zucchini on my hand grater for this small amount so why not just grate the onion along with it.  Saves time and mess.  Be sure to squeeze most of the liquid from the grated veggies or your cakes will fall apart when it cooks.  I just grab it in my IMPECCABLY clean hands and squeeze the life out of it.

Use white bread crumbs instead of Panko; substitute chives for the onions.  Change up the cheese and add your choice of fresh herbs or garlic.  I left them out this time because of the pepper jack cheese.  I also had an open jar of my homemade tomato sauce open in the fridge to sauce these with but you could top this with lots of other things.  Use what you have.  That's what this recipe is all about.  AND WAS IT EVER GOOD!!!  I wouldn't lie to you about that.  I ate three (I know!, but they were little).

Zucchini Cakes

2 cups of grated zucchini, squeezed dry
2 eggs, beaten
¼ cup of grated yellow onion, squeezed dry
½ cup of Panko bread crumbs
½ cup of grated Parmesan cheese
½ cup of grated Pepper Jack cheese
½ teaspoon kosher salt
¼ teaspoon of freshly ground pepper
1 ½ tablespoons of vegetable oil
1 teaspoon of butter
1 tablespoon of chopped fresh herbs (optional)
1/4 cup of fresh tomato sauce for dipping the cakes into

Heat the oil and butter in a non-stick skillet until it shimmers. Set the pan over medium heat.

Meanwhile, in a medium bowl, combine all of the ingredients. Stir just until blended.  Form into patties and carefully drop them into the skillet. Shake once to dislodge them from sticking. Let them cook for several minutes on each side until the cakes are golden brown. Drain on a paper towel.

Serve hot with fresh tomato sauce, applesauce, ranch dressing, sour cream, pico de gallo or some pesto.

Tuesday, July 5, 2011

Summer Salmon

I love light, fresh meals that don't weigh me down in the summer.  With 100 degree weather (102 forecast for the 4th of July) here, it's time to cook outside and make it lighter fare while we're at it.

This wild sockeye salmon is just the ticket.  Put the skin side down and sprinkle salt and freshly ground pepper over top.  Make a neat little hand-made foil tray for the grill, set the salmon skin side down in it and the salmon is ready to go.  Don't cover the fish with more foil.  Put the grill lid down and cook it until it's just cooked and moist.

Meanwhile, melt a little bit of butter in a skillet.  Sautee a few chopped scallions until translucent.  Add a handful each of halved grape tomatoes and chunked English cucumber pieces.  Just heat through about 1 minute.  You want the tomatoes and cucumbers just warm but still crunchy.  I like my veggies big but you could chop them finer for a more formal presentation.

Serve the vegetables over the salmon and squeeze a bit of fresh lemon over if desired.

Light, delicious, and healthy; but we like it because it tastes so good and fresh. 

Thursday, June 30, 2011

Grapefruit and Quinoa Salad

Some of my family like quinoa; some don't.  I was hoping that this salad from the folks at the Food Network would be a hit with my family.  And it was good.   I really liked this salad.  It made a terrific side to cold chicken slices.  However, I altered the recipe after making it the first time. 


I thought that the grapefruit flavor overpowered the other ingredients just a bit, so I decreased (by half) the amount of peel that I steeped in the dressing.  Perfect!  I can't wait to try this with another type of citrus.  I think orange would be great.  Some shrimp would make this a main dish meal.  E suggested that I add something for crunch next time; a bit of chopped cucumber maybe?  Mmmmm...good idea.

Here is my slightly-altered version of the original recipe.
*Make sure you do not get any white pith on the grapefruit peel.  It will make your dressing bitter.

Quinoa and Grapefruit Salad

1 medium grapefruit, 1/2 of  the peel removed and reserved
8 thin slices of fresh ginger
¼ cup of extra-virgin olive oil
¾ cup of quinoa
1 ½ cups of chicken broth
1/2 teaspoon of kosher salt
1 tablespoon of white wine vinegar
2 teaspoons of honey
1/2 -1 small Serrano or Jalapeno chile, minced
2 scallions (both white and green parts), minced
2 tablespoons of chopped fresh cilantro leaves
Freshly ground black pepper

Strip the peel (no pith) from ½ of the grapefruit. Warm the peel, ginger, and olive oil in a small saucepan over medium heat. As soon as the oil starts to bubble, remove from the heat. Let the oil steep for 30 minutes. Strain and reserve the oil.

Meanwhile, rinse the quinoa and drain. Put it in a saucepan with the water and the ½ teaspoon of salt. Boil, then reduce heat and simmer and cook uncovered for 15 minutes. Remove from heat. Let sit for 5 minutes and fluff with a fork. Cool.

Segment the grapefruit over a bowl, reserving the juice. Put the segments into another bowl and chill. Whisk 3 tablespoons of the grapefruit juice with the vinegar, and the honey. Salt to taste. Gradually whisk in the oil to make an emulsion. Season with freshly ground pepper to taste.

Toss the quinoa with the dressing, cilantro, chilies, and scallion. Season again to taste.

Serve warm or at room temperature.

Tuesday, March 23, 2010

Windy Ridge Cafe with the Girls

Last week we went to Park City to have lunch at Windy Ridge Cafe, a bright, fun, and wonderful restaurant.  My friend Rosie introduced me to it many years ago and it has remained a favorite of mine for several reasons.
  • It is a bit out of the way and it mostly caters to locals, not tourists (they don't know what they are missing).
  • The food is wonderful.
  • Their bakery is even more wonderful than the cafe.
This is one of my favorite lunch spots. We split a plate of sliders.  Our burgers were all-american, blue cheese with bacon, and avocado; I loved the Blue Cheese slider.  The waiter also kindly brought us extra set-ups so that we could share and split the bowl of South Western Corn Chowder and bread three ways. 

"What !?!, you say.  Are you guys just cheap"?  No, we were saving room for this (and we did tip generously, in spite of ordering just 2 plates for three people).


We more than made up for the very small lunch with the take-home treats we purchased at the bakery, which has been moved from the cafe building to a large building just across the back parking lot.

We each liked a different bakery item best, so that just goes to show that there is something for every taste here.  Cristie and I loved the nut bar, Barbara loved the fruit tart, and we all agreed that the lemon bar was "to die for". 


If you're looking for a great lunch spot, head on up Parley's Canyon to Windy Ridge Cafe.  And if you don't have time to eat in you can purchase some of the many pre-packaged food items from the cafe that the bakery has in their refrigerated cases.  The lasagna looked wonderful and I'd get a loaf of their bakery bread to go with it.  Whatever you do, be sure to take home some of these dazzling bakery treats.