
I love my new striped neck roll covers. I made two different covers for my rolls, the blue striped ones to match the Delectable Mountains quilt with the hand appliqued berry border and my other blue quilts and a pair of pink covers to match the antique1850's applique quilt and the 1840's Ohio basket quilt. There are plain white goose down pillows inside the rolls. I like to be able to change the quilts and pillow shams now and then for variety. I have quilts in all the bedrooms at the Stone House and I like to change them arpound and display a few of them at a time.
Here's how to make the removable round pillow covers:


Here's how to make the removable round pillow covers:
Measure the round pillow you want to cover:
- First measure the circumference of the circle (that means measure around the width of the roll, perpendicular to the stripes). My neck roll was 28" around. Now measure the length from one long end of the pillow to the other (parallel to the stripes). My roll measured 22" long. I wanted my pillow to fit snugly and fill out the case so I didn't add seam allowances to those measurements. Cut out 1 rectangle of fabric to the exact measurement of your roll (for my case, 22" x 28").
- Now measure the two ends of the roll. You need to find the radius of the end circles. The diameter is found by measuring from one side of the end to the other. Now divide the diameter by 2 to get the radius of the circle. I must admit my geometry terminology needed a bit of a dusting off. The radius of my roll was 4" (half of the end circle measurement). You will need to add a 11/4" to the radius measurement for the seam allowance for the casing. You will be threading a piece of ribbon through the casing to close up the ends of the roll after inserting your inner pillow. I cut 2 rectangles of fabric 28" (the circumference of the circle: see above) x 5 1/4" long.
I cut two rectangles 28" x 5 1/4". These are the ends of the cover.
I cut one rectangle 28" x 22". This is the main body of the cover.
2 lengths of ribbon for ends; I cut 2-36" lengths of 1/2" wide ribbon.
Optional piping: two pieces of trim each measuring the same as the width of the roll (28" each in my case).
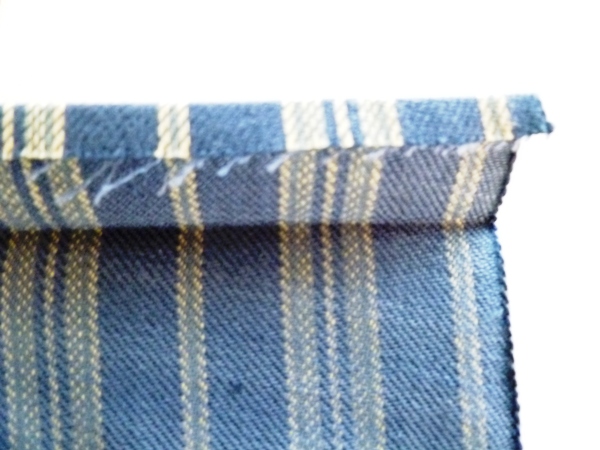
- Along one 28" side on both end pieces, press 1/4" under to the wrong side. Now press the 1/4" hems under another 1" on both end pieces. Each end piece will have one 28" side that is not hemmed and a side that looks like the photo above. Do not sew the hems down at this point. Once stitched, the hems will form the casings for the ribbon ties.NOTE: The casing seam allowance must be twice the width of your ribbon ties plus 1/4" turn under. If you use a ribbon that is a different width than 1/2" ribbon, you will need to adjust the casing and hem measurements .
- If using trim or piping, place the raw edges of the piping to the short end (28" in my case) of the main fabric piece, right side of the fabric facing up. Pin the piping in place. Baste the piping to the main rectangle (longest side) by sewing directly over the piping stitching. See photo above.
- With right sides together, pin the piped end of the rectangle to the unpressed side of the end piece. The piping will be inside the two rectangles and the hem will be toward the middle, underneath. Place the main body piece with the piping stitching side up (see photo above), so that you can see the basting stitches of the piping. These stitches will be your guide. With a shortened stitch length (not basting length), adjust your machine needle and stitch just left and inside the previous basting stitches, close to the piping but be careful to not stitch into the cording. In the photo above, you can see that the needle is slightly to the left of center of the cording foot, putting the new stitching just left of the previous basting stitches. This will ensure that you get even width piping and that you won't see the basting stitches on the right side of the cover after turning it right side out.
- Repeat with the other end and press the seams open. Trim 1/2" off the ends of the cording inside the piping. This removes the cording from the seam allowance and reduces bulk.

See my previous post for tutorial on making your own piping.
Now you have one long rectangle with 2 rows of piping between the main body and the end pieces.
 The pressed hems should be opened and un-stitched on each end at this stage.

- Open out the hems and fold the rectangle right sides together lengthwise. With the casing hems opened flat, measure in 3/4" from one end and make a mark (I the middle pin for this mark). Then measure another 1/2" toward the middle from the first mark and make another mark (far right pin). You will not stitch between the middle and bottom pin. Repeat for the other hem. This 1/2" area between the marks will be left open for ribbon casings on each end.
- Starting at one end, stitch 3/4" in and backstitch. Cut your thread. Skip the 1/2" between the marks and at the next mark, backstitch and continue sewing down the edge of long side until you reach the next mark (1 1/2" from the end of the roll). Backstitch at the mark and cut your thread. Skip the 1/2" area between the marks and backstitch and sew to the end of the cover.
- Press the long seam open.
- Turn the cover right side out.
- Turn the pressed hems under to the wrong side to form the casings. You should have an opening on the right side of the fabric to thread your ribbon through.

You can see the casing opening in the photo below (where the scissors are inserted). This is where the ribbons will be threaded.

Come back in a bit and I'll post a tutorial for making continental pillowcases with envelopes. I like them because the make a nice compact case that your pillows won't slide around as much a standard cases. They also like neat and tidy on the pillows. And I can make them to match my other bed fabrics, which is sometimes hard to do with purchased pillowcases. Linked to Tutorials and Tips

- Insert a large safety pin into one end of each ribbon and thread your ribbons in the casings. Insert your pillow form and pull the ribbons tightly. Tie the ribbons in a square knot and then in a bow.
- Trim the ends of the ribbon and apply Fraycheck to the ribbon. *Don't trim your ribbon ends short as you will need to be able to extend them out to remove the inside pillow for laundering.
We have quite a few more quilts in our collection so I'm on the lookout for cute fabrics to make more cases for other beds with quilts.
Come back in a bit and I'll post a tutorial for making continental pillowcases with envelopes. I like them because the make a nice compact case that your pillows won't slide around as much a standard cases. They also like neat and tidy on the pillows. And I can make them to match my other bed fabrics, which is sometimes hard to do with purchased pillowcases. Linked to Tutorials and Tips


Your neck rolls are so pretty Bonnie. I love that you can change them out to go with one of many beautiful quilts!
ReplyDeleteI admire those of you (my mother included!!) who have the patience and the know-how to sew beautiful and practical things! It's not one of my gifts...but I appreciate the time that it takes...and the results of these projects!
ReplyDeleteOh I am mooning over those beautiful antique quilts ! They are stunning in your rooms. The neck rolls really set the quilts off, something old and something new.
ReplyDeleteYou have the perfect rooms for quilts. I'm so envious, I love them.
ReplyDelete