
You might remember this post on neck roll pillows last week. I made my own piping and promised a tutorial on how to do it.

I never use packaged piping as I like to customize the color and fabric of my piping and I tend to use smaller cording than in the packages. I used a green micro print for the neck rolls below to coordinate with the green in the circle fabric.

It's easy to make piping and making it saves money. I can also vary the size of the cording (thread) inside the piping depending on my project.
Here's how I make it:
- First purchase cording or string the diameter that you desire your piping to be (this determines the fabric width that you will cut).
- Roughly tear or cut a strip of fabric twice the width of your seam allowance plus the diameter of your cording. I add another 1/2" to that measurement so I can trim it after I fold it in half and press it. I can be most accurate by doing it this way. Press the fabric strip in half with the right side of the fabric facing out.

(My seam allowance is 1/2" and my cording diameter is about 1/8", so the total width I need for my piping is 5/8"). But remember that the piping is folded so you need to double that finished measurement. I needed a flat width of 1 1/4" wide. I added another 1/2" to that measurement and I trimmed it off 1/4" from the raw edge after pressing, leaving my finished folded strip 5/8" wide.
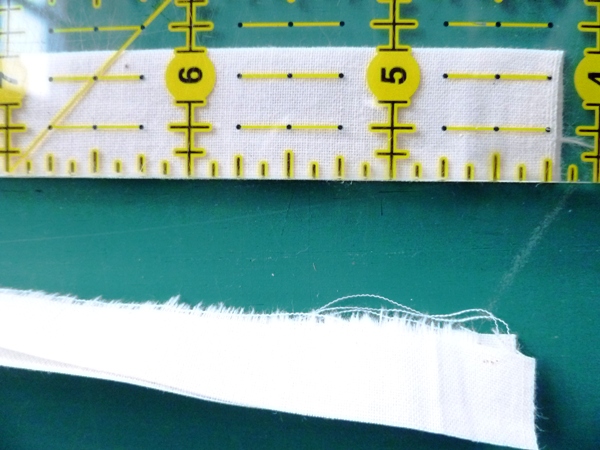
DO NOT TRIM FROM THE FOLDED EDGE BUT THE RAW EDGE.
If you are a very accurate presser than I , you can just cut your strip to the final width doubled the first time.
- Attach a cording foot or zipper foot to your machine and set the stitch length at a basting length ( I use a 3.5 stitch length on my machine for basting and I sew with a Pfaff sewing machine).
 While a zipper foot works fine, the cording foot is even better for making piping. It allows the cording to ride in a groove, keeping the cording in place as you baste. Cut a piece of cording or string slightly longer than the fabric strip and insert it inside and against the folded edge of the strip. I use a cording attachment but you can also use a zipper foot.
- Place the cording in the groove just left of your needle or to the left of the zipper foot.


Your stitching should be close to the cording but leave enough space between your basting stitch and the cording so that you can sew your final seam just inside the basting thread against the cording. (I have an adjustable needle in my machine and I set the needle one setting to the left for the final seam).


*I piped seams that were on the straight-of-grain, so I cut my fabric strips for my piping on the straight-of- grain. If you are piping a curve, make your piping the same as directed above, but cut your fabric strips on the bias grain line. Bias curves more than straight grain lines and lays nicely around curved pieces.
- Baste the enclosed cording inside the piping.

- To sew the piping onto fabric, put the piping onto your pattern piece with raw edges aligned. Stitch on top of the basting stitch on the piping using a basting stitch again. This will anchor your piping so that you can make the final seam stitching the piping down. Shorten your final stitch length to a sewing (not basting) length.


- After basting the piping in place, put your second piece of fabric right sides together against the first piece and pin the piping inside the two pieces of fabric. I turn the piece of fabric with the piping attached to the top side, facing me. I put the fabric without the pipin on toward the face plate of my machine. This way I can see the basting stitch that is already holding the piping in place. I then move my needle one setting to the left and stitch just left of the basting stitch, close to the cording. I can be sure that the basting stitch will be hidden when the fabric is turned right side out.
Tip: After basting the piping to your fabric (see above photo) and before stitching your final seam, pull cording equal to your seam allowance out from the end of each side of the piping strip. Cut both side pieces of cording away and discard (1/2" in my case because I used a 1/2" seam allowance).

Now pull the gathered up fabric strip to the right, letting the cording slide back inside the piping strip. The cord is now 1/2" away from end of the piping and the cord is inside the piping strip. When you sew your final seam there will be no cord in the seam allowance, thus less bulk. Do this on both sides of your piping before sewing side seams and your seams will lay flat without the cording in the seam allowance.
*I piped seams that were on the straight-of-grain, so I cut my fabric strips for my piping on the straight-of- grain. If you are piping a curve, make your piping the same as directed above, but cut your fabric strips on the bias grain line. Bias curves more than straight grain lines and lays nicely around curved pieces.
I hope you'll come back for a tutorial on making the neck roll covers.
Now go and make some piping. It's a great sewing skill to master and it will make all your piped projects look custom made and professional.


Nice work, Bonnie. And especially great tip about trimming the cording before the final seam for flat seam allowance. I never thought of that! Thanks for the tutorial, I'll be back for the pillow covers. :)
ReplyDeleteLookin' Good Ms. Bonnie. I luuuuvvvv cording -- I think it adds such a pretty accent. Thanks for the tutorial!
ReplyDeleteGreat tutorial!
ReplyDeleteAnd thanks for your sweet comments too.
I love to sew when I get a chance and this will be a handy guide.
Cindy
I love piping and have been sewing for years and never seen that attachment! Thanks!
ReplyDeleteYou are a sewing wizard! I want to be like you one day :)
ReplyDelete